Select Vessel  Crane Work List.
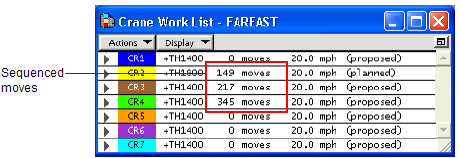
XPS can automatically create a preliminary assignment of the work queues. This is especially helpful for large vessels. XPS auto-sequence does not split queues or bays between cranes, so the result is initially not balanced. However, with a few quick manual rearrangements, you can create an excellent crane sequence using this method.
To auto-sequence work queues:
Set your views (on page 1).
In the vessel profile view, verify the number of cranes.
A check mark indicates the current selection.
The number should match the number of cranes displayed in the Quay Commander window when Shift Automation (on page 1) is turned on.
Select Vessel Crane Work List.
The Crane Work List window (on page 1) opens. It is empty if you have not yet assigned any cranes to the open vessel.
From the Display menu, select All Cranes.
Ctrl-click to select the required cranes from the list.
The number of cranes that you select in the Crane Work List window must match the number of cranes specified in the vessel profile view (crane split). The cranes in the Crane Work List window should also have associated shifts. Cranes with shifts display their date and the estimated moves per hour.
In the vessel profile view, from the Cranes list, select any of the following options:
Sequence Dis & Load Aft->Fwd
Sequence Dis & Load Fwd->Aft
Sequence All Dis Before Load Aft->Fwd
Sequence All Dis Before Load Fwd->Aft
Sequence Dis Aft->Fwd, Load Fwd->Aft
Sequence Dis Fwd->Aft, Load Aft->Fwd
If these options are unavailable, make sure you selected the Show Crane Split option. For details, see Set your vessel and views (on page 1).
XPS automatically sequences the moves and assigns them to the selected cranes. For more information, see Automatic move sequencing in XPS (on page 1).
After creating the rough crane plan, you can develop (on page 1) and refine it.